Day 22- Balloon Launch & Recovery Attempt

Today we launched our 1200 gram balloon from Mt. Greylock State Reservation in Lanesborough, MA.  We launched right near the visitors center, in a big field.

We started the day by loading everything into my car, while the other cars took the passengers.  Here’s a picture to show you how crowded it was.

IMG_20120801_083530

It took us about 3 hours to convoy out there, and I insisted that we stop for coffee because many of us were running on very little sleep.  We arrived at the launch site around 11:30 am, and started the process of assembling everything.

Nate started filling the balloon while Fjodor and I worked on assembling the payload packages.  I turned on the cameras and started the script (which takes pictures every 5 seconds automatically) and the Arduino to start logging temperatures.

Fjodor worked on testing our communication systems via aprs.fi, and everything worked out.  We assembled everything and launched around 1:25 pm.  Jean started the cutoff mechanism right around 1:10, so 3:17 would be the time where the mechanism starts cutting through the rope and releasing it from the balloon.

Here’s a video of the actual launch!

Balloon Launch 8/1 BUSAT


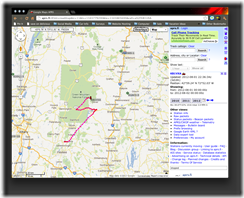
We were using our smartphones and Nate’s callsign to track where the balloon was in real time by using aprs.fi  It worked out great, and we received signal that it reached 95,000 feet and landed in Dover, Vermont.

 2012-08-05 01.15.16 pm

We ended up tracking it into the woods, and found the Balloon, but it was in a tree.  We didn’t have a way of getting it down, so we had to leave it there and regroup.  It ended up being right off of VAST trails in Vermont, which are public land, and it was high up in a tree that we weren’t worried about something happening to the balloon.

IMG_5980

On the ride home, we formulated a plan using a bow and arrow attached to fishing line.  If we shot that over, we could tie rope to where the arrow was, and pull a heavier duty string over the tree to pull it down.  We stopped in Gardner, MA, where I grew up, and picked up my bow and arrow, with the though of going back out tomorrow to retrieve our payloads.

Day 20- Writing Code/ Building Boxes

Today I spent a majority of the day writing code for our Arduino, which had the sole job of saving the temperature sensor data. I spent hours reading articles about how to save to an SD card, but it wasn’t working as expected, and I had 5 different temperature sensors that I needed to save the data from.

IMG_20120730_141327

During this time, my lab partner was assembling the payload boxes across the street, so that we would just have to put our electronics in it.

We had a brown bag lunch where everyone talked about their subsystem documentation, as it was due by 3 pm today to Nate so he could put it all in a document to send for review.

We then had a brief meeting to talk about progress on assembling everything, and we were feeling pretty good about what we had to do.

In the afternoon, I went back to trying to code for the Arduino to save the temperature data. I was having a ton of problems with it, so I had a lot of guys from the lab help me out with writing the code.  It ended up being after 7pm and everyone had to leave, so we figured that we could finish it the next morning.

Unfortunately, my partner wasn’t as productive as I had hoped, and only assembled one box- and took off early, which was a little frustrating.  I hope tomorrow goes smoother!

Day 19- Labs with Teachers/ Lesson Plans

Today started off with running the laboratories with running the temperature sensor laboratory as well as the Monte Carlo Method laboratory with the teachers.  The temperature sensors that were built were hot glued together and will be flown on our high altitude balloon next Wednesday. 

IMG_20120727_095639

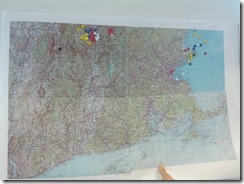
The Monte Carlo method is a way of predicting, using known data (like NOAA weather data in our case) where an object has the greatest probability of landing.  In our case, we can predict landing sites based on known weather patterns and a known launch site (Mt. Greylock).

We approximated landing sites, the cluster near the Vermont/NH border is a launch from Mt. Greylock, while the pins at sea were from a launch from the Photonics center in Boston.

IMG_20120727_153617

We spent the rest of the day talking about what lessons we will take back to share with our students.  I will take back the importance of collaboration and maybe the use of lab notebooks.  Also, I will take back the perspective of being someone who has lived in the city- completely different from my life in Western MA.

Day 17- Filmed and Edited Lab #2,

Today we finished filming how to go through laboratory #2, and edited it using iMovie.

Lab #2 Temperature Sensors

We finished that up right before lunch, and ended up resoldering some of the breakout boards we had created, because they weren’t making great contact. Chris taught us how to use continuity testing to test, a great technique that is coming in handy.

We had a meeting with everyone involved on the Balloon Launch after lunch, where we laid out all of our supplies and made sure we would be set for the launch next Wednesday.

At this point, we decided that we had to test the radios that we would be using; one was programmed with Nate’s callsign and transmitted GPS location to APRS.  We finally got it working when we went on the roof of the CAS Building.  This took most of the afternoon, and we also tested the beacon that broadcasted a signal only 3 miles, so we would be able to find the general location with a directional antenna.  Here’s a view from the CAS roof.

IMG_20120725_155511

Day 15- Art Supplies and Building

We started today off by editing our first film and posting it on Youtube.  This means that we finally finished everything associated with laboratory #1.

Laboratory #1- Introduction to Electronics

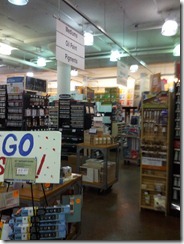
We headed to Blick Art Store in the landmark center, and bought entirely too much foam.

IMG_20120723_110105


photo (1)

We had a brown bag lunch with BUSAT, and the theme was around the final push.  Documentation was being created by each subsystem and put together into a final design document.  Each subsystem group shared where they were in the process.

We spent the afternoon constructing the cutoff mechanism with Jean and working on different aspects of the balloon.  I built the cutoff mechanism box while Jean worked on testing the cutoff mechanism, Fjodor worked on creating the Adafruit Data Logger Shield from the kit that we ordered.  It looks like it will be a busy week!

Day 13- Frustration with Code!

Fjodor and I started out Day 13 by starting again on the lab, hoping to go through laboratories #2 and #5, the labs we will be running with our group of teachers next week.  We started our the day going to the laboratory and working on Laboratory #2. 

When we started Lab #2, our Temperature Sensor Lab, it ended up being that they had someone solder the MAX6675 to some breakout boards.  Fjodor and I hadn’t ever soldered, so we learned and tried to make our prototype.

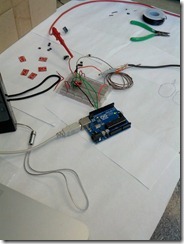
Our board uses an Arduino to interface with the computer and give us a temperature output.  We started by using last year’s script, but because Arduino has since updated their library, that script wasn’t working.  In fact, it wouldn’t even compile.

We ended up finding another script online, which still wasn’t compiling.  It ends up that the script was using SCK, which is now an Arduino library.  We found and replaced SCK with CLK, and the script compiled.

We were, however, still receiving an interesting output- about 270 degrees Celsius.  We kept trying to figure out why it was so high, but we couldn’t figure out why it was so off. 

For the rest of the day, I recoded the script to get it to work.  Around 4:45 pm, I ended up realizing that it was reading off by a decimal point.  It should have been 27.0 degrees Celsius, not 270 degrees Celsius!  I quickly recoded the solution, and it worked!

Here is our script for the MAX6675 temperature sensor with K-type thermocouple

/*
  Temperature Reading from a MAX6675

Modified By Jason DeFuria, BUSAT <[email protected]> on 7/19/2012

Ryan McLaughlin <[email protected]>
*/

#define SO 12    // MISO
#define CLK 13   // Serial Clock

#define TC_0 11  // CS Pin of MAX6607
int TC_0_calib = 0;  // Calibration compensation value in digital counts (.25˚C)

void setup() {

pinMode(SO, INPUT);
pinMode(CLK, OUTPUT);

pinMode(TC_0, OUTPUT);
digitalWrite(TC_0,HIGH);  // Disable device

Serial.begin(9600);
}

/* Create a function read_temp that returns an unsigned int
   with the temp from the specified pin (if multiple MAX6675).  The
   function will return 9999 if the TC is open.

   Usage: read_temp(int pin, int type, int error)
     pin: the CS pin of the MAX6675
     type: 0 for ˚F, 1 for ˚C
     error: error compensation in digital counts
     samples: number of measurement samples (max:10)
*/
float read_temp(int pin, int type, int error, int samples) {
  float value = 0;
  int error_tc;
  float temp;
  float temp_out;

  for (int i=samples; i>0; i–){
    digitalWrite(pin,LOW); // Enable device

    /* Cycle the clock for dummy bit 15 */
    digitalWrite(CLK,HIGH);
    digitalWrite(CLK,LOW);

    /* Read bits 14-3 from MAX6675 for the Temp
         Loop for each bit reading the value and
         storing the final value in ‘temp’
    */
    for (int i=11; i>=0; i–){
        digitalWrite(CLK,HIGH);  // Set Clock to HIGH
        value += digitalRead(SO) << i;  // Read data and add it to our variable
        digitalWrite(CLK,LOW);  // Set Clock to LOW
    }

    /* Read the TC Input inp to check for TC Errors */
    digitalWrite(CLK,HIGH); // Set Clock to HIGH
    error_tc = digitalRead(SO); // Read data
    digitalWrite(CLK,LOW);  // Set Clock to LOW

    digitalWrite(pin, HIGH); //Disable Device
  }

  value = value/samples;  // Divide the value by the number of samples to get the average

  /*
     Keep in mind that the temp that was just read is on the digital scale
     from 0˚C to 1023.75˚C at a resolution of 2^12.  We now need to convert
     to an actual readable temperature (this drove me nuts until I figured
     this out!).  Now multiply by 0.25.  I tried to avoid float math but
     it is tough to do a good conversion to ˚F.  THe final value is converted
     to an int and returned at x10 power.

   */

  value = value + error;  // Insert the calibration error value

  if(type == 0) {  // Request temp in ˚F
    temp = ((value*0.25) * (9.0/5.0)) + 32.0;  // Convert value to ˚F (ensure proper floats!)
  } else if(type == 1) {  // Request temp in ˚C
    temp = (value*0.25);  // Multiply the value by 25 to get temp in ˚C
  }

  temp_out = temp;  // Send the float to an int (X10) for ease of printing.

  /* Output 9999 if there is a TC error, otherwise return ‘temp’ */
  if(error_tc != 0) { return 9999; } else { return temp_out; }
}

void loop() {

  // Read the temperature and print it to serial
  Serial.print(“Temp F: “);
  Serial.print(read_temp(TC_0,0,TC_0_calib,15));
  Serial.print(“\tTemp C: “);
  Serial.println(read_temp(TC_0,1,TC_0_calib,15));

  delay(250);
}


Here are some pictures:

IMG_20120719_122449

Our setup connected with an Arduino Uno


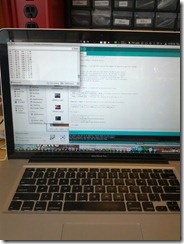
IMG_20120719_163955

Running Arduino on my Mac

Day 12- Working in the lab!

Day 12 started out again with us finishing up the first revision of the laboratories.  Fjodor and I finally put them into a form that makes sense to us, and all we need to do now is edit them as we are completing the labs as a student would.  This took until lunch time, but it’s nice to know that we figured out many of the logistical necessities before trying to complete the labs.

We had a meeting after lunch with the Balloon Launch team.  We’re getting close to our August 1st launch date, so we’re working on what logistics need to be solved. We are still waiting on some supplies to arrive, and working out the purchase of local supplies.  We also need to solder some of the parts that came disassembled, which will take most of our Monday afternoon, working with Jean to also complete our protoprototype of the cutoff mechanism for environmental testing.

We spent the rest of the afternoon in the lab, working on completing Lab #1- Introduction to Electronics, as we had written it.  We ran into a few problems, but were able to get the laboratory working and completed.  It’s nice to have one completely finished laboratory- We’re not even halfway done yet!

Here is a picture of our first lab introductory activity supplies and our first setup!

IMG_20120718_142318

Lab #1 Required Materials


IMG_20120718_144249

Lab #1 LED Setup

Day 10- Almost done labs!

Today started off pretty well- I drove in from Sunderland, like I do on Mondays.  It only took 2 hours and 20 minutes.  I should have left a little earlier, but it happens to the best of us on Mondays. 

Fjodor and I started working on our Mask templates, as we are going in the cleanroom tomorrow.  I have my camera charged and ready to go, because I know tomorrow is going to be a fantastic day for photo opportunities!  Here is a screenshot of my mask template!

2012-07-16 04.08.22 pm

After finishing the mask template, we went to work on the labs.  We are pretty well edited, at least every single one has been touched by both of us- twice.  Around noon, Nate stopped by and gave us our data logger for the high-altitude balloon launch, which had arrived from our first order.

At 12:45pm, we had a BUSAT brown bag lunch, where we watched about the newest Mars mission, and watched the press conference.  It was really cool to watch an interesting event with a lot of people interested in it.  That sounds like a vague statement, but I promise it’s not.

If you’d like to learn more about the Mars Rover, Curiosity, check it out on the NASA Jet Propulsion Laboratory’s website: http://marsprogram.jpl.nasa.gov/msl/.  There are all kinds of educational activities there.

We spent the rest of the day editing laboratories and coming up with an updated timeline of when we hope to accomplish each step.  I decided that I’m going to try to spend the end of each workday blogging, so that I don’t have to spend time outside of here doing so! 

Day 9- Typical day so far!

This week’s pedagogy session was more self-directed, so Fjodor and I have more time to edit laboratories after we finish that.  We spend the beginning of the morning reviewing the required pedagogy materials, and then started editing labs.  I do have some questions to answer for this weeks lab.

What is the hypothesis you are testing?

The hypotheses that we’re testing is as follows:

Near space conditions will not affect the electronics circuits in our homemade temperature sensors.

A modified cell phone with GPS is able to replace a full fledged GPS unit.

What kind of controls does the experiment have?

The controls we will have are manufactured and calibrated thermometers purchased from a local store.

A GPS locator will be placed on board to see how accurate our modified cell phone unit was.
How will you measure your results?

Results will be measured by an Adafruit data logger, which will be connected to our sensors.

How will the reliability of your data be ensured?

Reliability will be ensured with multiple controls, which will allow us to test for internal consistency.

For the rest of the day, Fjodor and I are planning on finishing the editing of a few laboratories, and working on our MASK template for next week’s clean room experiment.  I can’t wait to show you some of those pictures!

Day 8- Editing labs, rejoicing with BUSAT undergrads

Today was again pretty uneventful in our world; we’re making the laboratories better/ easier to understand for high school teachers/ high school students.  We’ve almost finished 2 labs right now, with work done to the other 3 (4 really, we’ve yet to start writing our test balloon lab). 

The cool thing that happened towards the end of today was that the undergraduates in our laboratory finally finished the project that they are working on, and are creating their final document.  They made an model of an optical sensor with a 3d printer, and have been spending countless hours making everything work.  Today, everything finally started to work, and they were able to see, through diffraction, different lights and how many bands there are.  It was really awesome to watch something that started off as a dream to them come to a reality.  While it isn’t groundbreaking research, it’s something that they should be very proud of!  Congrats Jonah and Pete!  I was certainly impressed by your work!